Index:
- 4.1. Note References
- 4.2. Labels
- 4.3. Location coordinates: After + In
- 4.4. Values - Period 1 column
- 4.5. Simplified tag
- 5.1. Elements list
- 5.2. Group hierarchy and Presentation Linkbase
- 5.3. Location coordinates: After + In
- 5.4. Values - Period columns
- 5.5. Simplified tag
6. The functionality: 'TextSearch tagging' and 'Area Tagging'
7. Condensed FAQ about TextSearch
1. Welcome TextSearch!
We are excited to introduce you to the release of the newest feature in our ESEF solution. This new functionality to the solution will enable you to work seamlessly with block tagging of notes, while leaving you with the lowest margin of error after converting files. Furthermore, this addition will make the future of block note tagging almost effortless, with changes to tags and additions in text not requiring any major changes to the PDF file.
In this article we will go through the main features of TextSearch. Following this introduction, Bianca from our Product team will highlight the new process of block tagging notes in your financial report.
We will then proceed to dig a bit into depth with the functionalities of the newly added Areas and Notes sheets in the Excel file.
Lastly, an FAQ will be presented as well as the forthcoming steps you will have to take in order to get started with the TextSearch method.
2. How to use TextSearch
3. Updating your Tagging file
To use the TextSearch functionality, you will need to include the new Notes sheets in your Excel template. To get this sheet, download our master tagging template and copy the sheet to import it directly to your file:
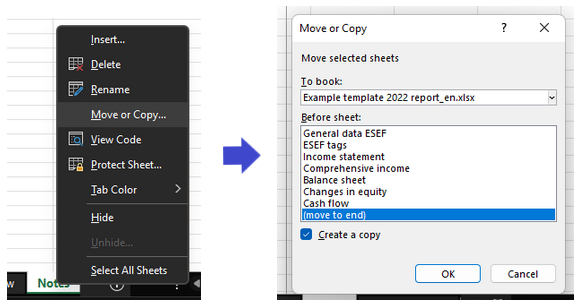
We recommend you also have a copy of the following sheets in your template:
- Areas (Allows you to define areas within your report)
- ESEF Tags (List of the mandatory elements)
- DKGAAP Tags (List applicable only clients that need to report in DKGAAP)
Keep in mind that in order to use the TextSearch functionality you will need to migrate all your notes information to the new Notes sheet. Please, use this link to get the master template, and find instructions on how to update your Excel template to the last version if necessary.
4. The new 'Areas' sheet
The Areas sheet allows you to define specific areas for tagging in your report. This will allow you the opportunity to define more granular areas in your report without having to embed many area tags (see section 6 for more information about Area tagging). The areas defined in your Areas sheet can be referenced when tagging your notes. Below you will find a detailed breakdown of each relevant section of the sheet:
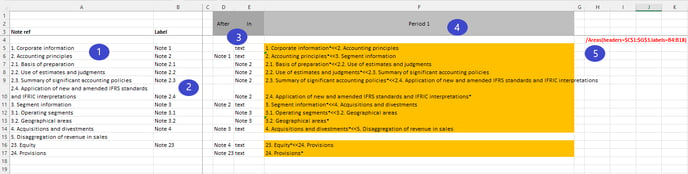
4.1. Note References
In the Note ref column, the various sections and sub-sections of your notes will be listed out as they appear in your report. These columns can be easily referenced in the Period 1 column to easily define specific areas within your report.
4.2. Labels
Here, labels will be assigned to the defined areas. These labels can be referenced in your Notes sheet when tagging your report.
4.3. Location coordinates: After + In
Use the ‘After’ and ‘In’ columns to indicate where information is located within the already defined areas.
- The ‘In’ column must always be used to instruct the system in which area the information that you wish to tag is located.
- The ‘After’ column allows you to instruct the system if the tag should be embedded right after a specific defined area or element.
4.4. Values - Period 1 column
In this column, coordinates for the corresponding labels will be specified. You can use Excel's formula function to easily set these by referencing the content in the Note ref column.
4.5. Simplified Tag
Similar to other simplified tags throughout our tagging template, this formula helps our engine convert and correctly transform the information in your report to XBRL. This tag should not be deleted.
5. The new 'Notes' sheet
Once you have updated your template by including the new Notes sheet, you will be ready to get started. Below you will find a detailed breakdown of each relevant section of the sheet:
5.1. XBRL Presentation
Here you should list each element you will use when marking-up your notes. These elements must be written as they appear in the taxonomy. You can find a list of all mandatory elements in our ESEF Tags sheet.
5.2. Location coordinates: After + In
Use the ‘After’ and ‘In’ columns to indicate where information is located within the already defined areas.
- The ‘In’ column must always be used to instruct the system in which area the information that you wish to tag is located.
- The ‘After’ column allows you to instruct the system if the tag should be embedded right after a specific defined area or element.
5.3. Group hierarchy and Presentation Linkbase
The Presentation Linkbase of your ESEF report is directly determined by the order of the elements within XBRL Presentation and how they are grouped. You can use Excel’s native data grouping feature (Data > Group) to arrange the presentation linkbase accordingly.
5.4. Values - Period columns
In these columns, you will script precisely to which specific information the embedded tag should be applied.
The application of tags is now done via scripting. When scripting you either specify the exact word/phrase or the start and end of the information you want to tag. By using the following specific symbols, you can indicate to our engine the exact place where the information is located.
| Symbol | Meaning |
| * | Total or first occurrence in the report |
| * | Between (If we add the start and the end of the desired section) |
| < | Before |
| << | One line before |
| > | After |
| >> | One line after |
See our ParsePort Cheat Sheet here.
In most of the cases you will only use the Period 1 to block tag your notes to the financial statements, but the template includes an extra column for Period 2 in case there is a specific information that should be linked to the previous year.
5.5. Simplified tag
Similar to the other simplified tags throughout our tagging template, this formula helps our engine convert and correctly transform the information in your report to XBRL. This tag should not be deleted.
6. The functionality: 'TextSearch tagging' and 'Area tagging'
The TextSearch approach allows you to control the level of granularity when tagging your report. As soon as you list your elements, you can indicate to the engine where they start and where they end by using the asterisk symbol (*) in the values (Period column). This is known as TextSearch tagging and enables the engine to find the first occurrence of the indicated information in the template.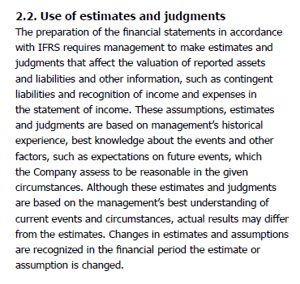
This section with Text search tagging would require "2.2. Use of estimates and judgements*assumption is changed." in the Excel template.
If your report has a special layout and your information is presented across pages creatively, you will have to engage in Area tagging by embedding an area tag onto each column or table that is included in your notes. Because these tags help the engine understand the reading order of your report, it is important that the area tags are embedded in the order that you would read the report.
When embedding an area tag, you must begin your link with the syntax area:// followed by your desired text.
The hyperlink contains the same text that we have added to the Excel template.
7. Condensed FAQ about TextSearch
TextSearch is a new method and understand that you may have some questions. Please find below some of the common questions regarding the tagging template or TextSearch approach and how it tags the information in your report:
Q: How do we do the block tagging using the TextSearch method?
Simply prepare the selection of the mandatory elements present in your report, define the areas, list them in the Notes sheet and use the functionality parameters to configure where the tag needs to be placed in your report, where it starts and where it ends.
Q: I need to change some text in my notes, will that affect the tagging in my excel?
It does not matter if the content of your tag is changed or edited over the different versions of your report. The coordinates will be saved in your Excel template and the engine will use them to locate the tag in your ESEF file every time you convert your files.
Q: How should I tag a table?
You can either tag it using the first and last wording of the table, or even using the information present after the table so the engine can locate the specific part of your report that you want to use. However, we recommend using the area definition in your Excel. If needed, you can create a defined area in your template to ensure the tagging of the table.
Q: Is it possible to multi-tag information?
Yes, definitely (and you should according ESMA guidelines). You will be listing all the elements used in your report and scripting their location. Our engine will do the rest for you.
Q: I have hypertags in my visual aspect. Will it work?
Yes. The two approaches can coexist in the same conversion. However, you should not attempt to combine both approaches to tag the same information. If you experience issues or have doubts in this regard, please contact our support team.
Q: Auditors ask me to proof that this new method works, what should we do?
You can prepare your own files following this guidelines or download the following sample files to troubleshoot and test the functionality.
8. Where to start?
The new method and its processes were put in place to lighten your workload related to block note tagging and it is ready to be used with the materials you have already prepared.
If you have already prepared a list of the elements that you want to use for block tagging your notes, you will simply have to copy that list from the Excel you are working in, and paste it with CTRL+SHIFT+V into the new 'Notes' sheet. You will then be able to keep the exact same structure that you already created and leave the elements you will not be using.
If you have yet to prepare the list, you can use the element overview from the 'ESEF hypertags' sheet to pick and choose from. From there you can plot the elements of your choice into the 'Notes' sheet and start working on the scripting that was explained in the sections above, afterwards.
Likewise we will appreciate any feedback for the TextSearch method and its functionalities. You can post feedback using this link.