Last reviewed: 06/8-2024.
When you’ve been onboarded as a ParsePort customer we provide you with a fully tagged Excel template, which you will use when converting your annual report to ESEF.
This Excel template contains the figures for your most recent annual report and moving forward all you need to do, is to update the template to fit your next annual financial report by following one of the two guides on this page:
- Updating Your Excel Template without Account/Mapping Changes
- Updating Your Excel Template with Account/Mapping Changes
Any questions about updating the Excel template should be answered in the guides below. In case your question isn't answered, feel free to send your question to support@parseport.com and one of our Professional Services Specialists will get back to you.
Updating Your Template without Account/Mapping Changes
If you don’t have any changes to text in the accounts of your financial statements or the mapping, then you can simply follow the instructions below:
- The first thing you need to do when updating your Excel template from one year to the next, is to update the dates in your General Data Sheet. Start by navigating to the sheet titled “General data ESEF” and scroll down to the dates section. Here you need to update the lines “Start date of reporting period 1” and “End date of reporting period 1”. The rest of the reporting periods will update automatically based on period 1. The light blue colour just indicates that the cell has a different value than the default configuration.

- Afterwards you need to go through your financial statements and update your figures. You can decide the way to do it, either inserting a new column for the new period or typing manually again for both periods. You can first copy/paste the column containing your previous first reported period figures (the period 1 column) into the column that contains your previous second reported figures (the period 2 column) since for this new report, they will belong to the reported Period 2. Remember to keep the calculations, (the fields highlighted in green) as these contain sum-formulas needed to convert your files to a compliant ESEF report.

- Then you need to update the figures in your period 1 column to reflect the same information of your annual report. Again making sure that the fields highlighted in green remain unchanged, so they contain the sum-formulas needed to convert your files to ESEF.
Note: If any cells are highlighted in orange, it means they are set up to correct a rounding error, if this is the case, and you don't have the same rounding error for your new report, you need to remove the +1 or -1 at the end of the calculation. Remember to ensure that both, your Excel. figures and the PDF completely match.
- After this, your Excel template is ready for conversion along with your corresponding new PDF annual financial report, and you can even test the result by uploading only the Excel template to our platform, which will let you know if everything has been updated properly.
We always recommend that you run a test conversion using just your Excel template, to ensure that everything has been updated correctly. If you experience any issues feel free to reach out to us at support@parseport.com.
Updating Your Template with Account/Mapping Changes
If you need to make changes to either the mapping or to the text in the accounts of your template, then you simply need to follow the instructions below:
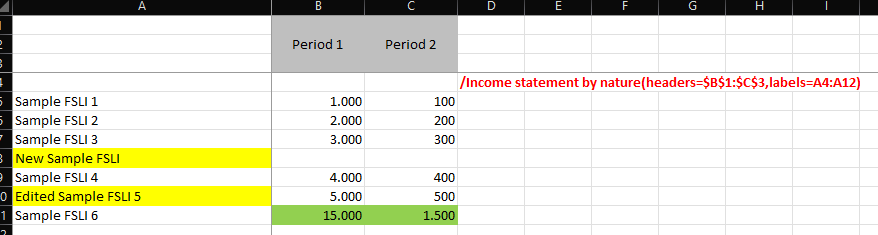
- The first thing you need to do if you want to add more lines to your annual financial statements or change your mapping is to make the changes in your template and align it with the structure and text with your PDF.
- You can add new lines by simply inserting a line in Excel, the simplified tags will then automatically update to include the new lines. Be mindful that you need to make sure to add the new line within the parameters specified in the simplified tags, they will then adapt to include the added line.
- If you want to change the text of one of your Financial Statements Line items (FSLI) you simply need to make the changes in the Excel template. Afterwards you should upload the Excel file to the ParsePort Platform and press convert. This way you can check if your changes have impacted the mapping, the validation will let you know if something within the file wasn't mapped.
- Anytime you make a change in your Excel template (New lines, different descriptions, etc.) and once you agreed internally and/or with your auditor on all your changes, please send the excel template with all the requests gathered and highlighted in yellow to the Professional Services team (support@parseport.com) for a mapping update. Although it is optional, a PDF draft that is aligned with the Excel template can also be sent, which can help our experts improve the accuracy of the elements selected in the update.
- You will receive information from our side when the update is done, and you can then start adding your new figures for the new report and prepare the new periods. To update your new Excel template from one year to the next, please refer to the information above: Updating Your Excel Template without Changes to Your Mapping
We always recommend that you run a test conversion using just your Excel template, to ensure that everything has been updated correctly. If you experience any issues feel free to reach out to us at support@parseport.com.